

MCP Development: Tutorial & Examples
Model Context Protocol (MCP) is a standard protocol that lets AI applications, especially AI agents, access external information and tools in a standardised manner.
Without MCP, developers must write separate integrations for each service, and if any service changes its behavior, those integrations must be rewritten. This becomes difficult to maintain as the number of tools grows.
MCP solves this by shifting the responsibility to the source itself. Each source provides an MCP server that exposes its data and functions in a standard format. Any AI application with an MCP client can then access that server in the same consistent way, without custom code or one-off integrations.
This article explains how MCP works, why it is useful, and the different components of an MCP lifecycle. You will also see hands-on examples of connecting MCP servers to MCP clients and hosts, and you will learn to develop a custom MCP server in Python.
Summary of key MCP development concepts
What is MCP?
Model Context Protocol (MCP) is an open standard introduced by Anthropic (late 2024) to standardize how AI agents connect to external data and services. It establishes a common language between AI agents and tools, so that any MCP-compliant host can work with any MCP-compliant server.
In an MCP system, an AI host (like a chatbot interface) does not call external APIs directly; instead, it uses an MCP client component to communicate with an external MCP server that provides specific functionality.
The MCP client translates the host’s high-level request into a standardized MCP format that the server understands, and the server returns a structured response to the client.
Why is MCP important?
Integrating AI applications with external tools involves a lot of manual work. Each service needed its own custom logic, and even small changes on the service side can break an existing integration. This creates a fragile system where developers constantly maintained adapters.
MCP solves this problem by introducing a single, shared communication protocol. The host only needs an MCP client, and every MCP server follows the same rules for initialization, messaging, and capabilities. This removes the complexity of maintaining integrations for each service.
MCP also makes capabilities discoverable. Instead of implementing functionality in custom code, MCP servers publish what they can do and what they offer in the form of tools, resources, and prompts, and the client can fetch this information on demand. When a server adds or updates a feature, clients can access it immediately without needing changes on the host side. This creates a modular and flexible system where servers can evolve independently while still working smoothly with any MCP-compatible app.
Difference between MCP and REST API
MCP and REST APIs both allow applications to communicate with external services, but they solve different problems. A REST API exposes a fixed set of endpoints, and it is up to the client developer to write the integration, manage authentication, map request formats, and handle any changes in the API. If the service adds a new feature or modifies an endpoint, the integration must be updated manually.
MCP takes a different approach. Instead of the client hard-coding what a service can do, the MCP server publishes its tools, resources, and prompts in a discoverable format. The client can fetch this list at runtime and use those capabilities without extra integration code. MCP also provides a consistent handshake, messaging pattern, and lifecycle, so every server behaves the same way regardless of the underlying service. This makes MCP more flexible than REST when working with AI applications that may need to connect to many different tools or frequently changing sources. In practice, MCP servers usually sit on top of existing REST or RPC APIs, but expose them to AI systems in a standardized, discoverable way.
In short, REST APIs require the application to handle all integration logic, while MCP shifts that responsibility to the server and provides the client with a uniform way to discover and use capabilities.
{{banner-large-dark-2="/banners"}}
MCP architecture
The MCP architecture defines three roles and their interactions: the host, the client, and the server.
Components
The host is the AI-driven application that the end-user interacts with, for example, a chat interface in a desktop AI assistant such as Claude Desktop.
The server is an external service that provides some capability. It could be a SaaS application like Slack or GitHub, a local utility such as a file system tool, or any service the AI might use to obtain information or perform actions.
The client is responsible for translating the host’s requests into the MCP protocol, communicating with the server, and then translating the server’s responses back to the host for processing.
The host itself does not directly talk to the server; instead, all communication is mediated by the MCP client component. This indirection (Host → Client → Server) is fundamental to MCP. It means the host can remain agnostic of the specifics of each server. In fact, the host cannot call a server without a client.
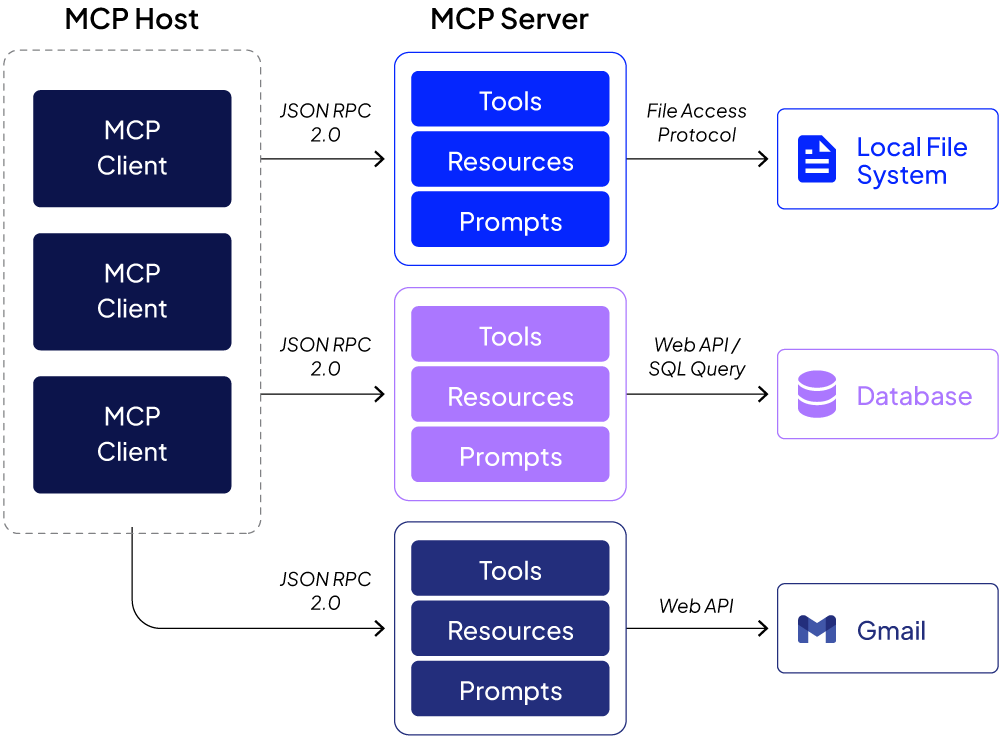
Each MCP client maintains a one-to-one connection to a single server. If the user’s AI app needs to connect to multiple servers at the same time, for example, GitHub and Slack, it will spawn multiple clients; one for GitHub’s MCP server and another for Slack’s MCP server.
This design keeps integrations decoupled and isolated. The host communicates with each server via a dedicated channel, which provides a safety benefit: if something goes wrong with the GitHub connection, it does not affect the Slack connection. In other words, MCP enforces a separation of concerns, making the system more robust and easier to extend.
MCP server primitives
Primitives are the standard building blocks that a server makes available to any client. In MCP, servers typically expose three categories of capabilities:
Tools
Actions that the server can perform on request. For example, a GitHub MCP server might have a tool to fetch the latest commits from a repository, or a calendar server might have a tool to create a new event. Note that these are similar to AI agent tools that you define as functions in your LLM application.
Resources
Read-only data that the server can provide. For instance, a server could serve up documents or database records that the AI can read. A GitHub server could expose repository README files or issue lists as resources.
Prompts
Predefined prompt templates or instructions stored on the server, which the AI can use to format its interactions. For example, a server might have a prompt template for a standard bug report or an email draft format.
Through standardized primitives, MCP ensures that clients can discover and use them uniformly across different servers. The client can query what tools, resources, and prompts a server offers, then invoke a tool or retrieve a resource through a defined MCP request. The server then carries out the action or returns the data in a structured response.
MCP communication protocol
All communication between an MCP client and server follows a consistent JSON-RPC 2.0 format, regardless of the physical transport. This means that requests and responses are JSON messages with defined fields, such as method names, parameters, result data, and error codes.
The transport layer can differ depending on the server type. For a local server running on the same machine as the host, the client and server communicate over the process's standard input/output streams (stdin/stdout). For a remote server (one running on an external machine or in the cloud), communication happens over HTTP, typically with the client sending HTTP requests and the server using Server-Sent Events (SSE) to stream real-time responses or progress updates.
This abstraction means a host can talk to a local tool or a cloud service using the same MCP conventions, resulting in a flexible architecture where adding a new server is as simple as writing it to comply with the MCP message format and plugging it into either a local STDIO pipe or a web server.
MCP lifecycle
When a host connects to an MCP server, their interaction follows a defined lifecycle with three stages. This lifecycle governs how the connection is established, how work is done, and how it terminates. The stages of the MCP lifecycle are
Initialization
This phase begins when the client initiates a server connection. The client sends an initialization request message to the server, which includes important information about the client itself, e.g., the client’s protocol version, permissions or capabilities, and implementation details, e.g., the client’s name and version number.
Once the server receives this initialization request, it responds with an initialization response message. In that response, the server provides its own details:
- MCP protocol version it supports
- List of its capabilities (e.g., the tools, resources, and prompts it offers)
- Implementation information (i.e., server name and version).
Now both sides know each other’s capabilities and agree on a protocol version to use going forward.
Finally, if everything in the first two steps went well, the client sends an initialized notification back to the server to confirm that the handshake is complete and the session is officially established. At this point, the connection is ready for regular operations.
Regular operations
After initialization, the MCP session enters regular operation. The client can now ask the server to perform actions or retrieve information on the user's behalf. The regular operations stage can itself be thought of in two parts:
Capability discovery
First, the client typically discovers what the server can do. Right after initialization, the client can request a list of the server’s available tools, resources, and prompts (capabilities). The server responds with details for each capability, including tool names, parameters it accepts, resource identifiers, etc.
This discovery step lets the host (through the client) know exactly what functions are accessible. For example, the client might list all the "tools" the server provides and find actions like "create issue", "read file", "send message", depending on the server.
It might also fetch a list of "resources," such as file names or data sets, that the server can supply. This step is important because it means the host does not need prior knowledge of a server’s features; it can query them dynamically.
Capabilities utilization
After discovering the capabilities, the client can start using them. In practice, this means the host (via the client) will send specific requests to invoke tools or retrieve resources.
For instance, if the server is a GitHub service and the user asks a question about new commits,
- The client formats the request as an MCP message (e.g., calling "getRecentCommits" method with certain parameters)
- The client sends the message to the server and awaits response
- The server executes the action by actually querying GitHub for new commits.
- The server then returns a response message containing the result.
- The client receives this MCP-formatted response
- The client translates the response back into a form the host can use, e.g., a piece of text or data structure to feed into the AI model’s context.
During the regular operations phase, both the client and the server are fully engaged, exchanging messages as needed. The host may issue many requests through the client, and the server performs the tasks and respond to each request. They continue this back-and-forth until the session ends.
Shutdown
The Shutdown stage of the MCP lifecycle involves gracefully terminating the session. The goal is to ensure no work is left half-done and both sides know the connection is ending.
In many cases, the client (on the host side) initiates the shutdown. On a local server, this typically means the client simply closes the server’s input stream (stdin).
On a remote server, shutting down corresponds to closing the network connection. The client will close the HTTP connection or end the session via the server's API. Since remote servers often serve multiple clients, the server might not shut down entirely just because one client disconnected, but from this client’s perspective, the session is closed.
Unlike the first two stages during shutdown, no complex protocol messages are typically exchanged. The client usually sends a final notification or simply close the channel, and both client and server release any resources (memory, file handles, etc.) associated with the session.
After shutdown, the MCP session is fully terminated, and if the user wants to use that server again, a new session with a fresh initialization handshake must be started.
MCP client-server communication examples
Let’s see some examples of how to connect an MCP client to an MCP server and perform some actions.
Connection methods
There are two primary ways to set up such a connection: using a Connector or using a manual JSON configuration. Both achieve the same end result, i.e., to inform the host’s client how to reach the server, but they cater to different scenarios and user preferences.
Connector method
A connector is a convenient, built-in integration provided by the host platform, e.g., an AI app like Claude Desktop or ChatGPT for popular services. Using a connector is typically as simple as clicking on a service name and logging in. The idea is that the host application includes a gallery of common MCP servers, e.g., Google Drive, Slack, GitHub, etc, that a user might want to use.
Connectors are curated and maintained by the platform, which often means they are available only for the most popular services for which the platform's creators have prepared integrations.
JSON configuration method
Not every server will have a ready-made connector. MCP is an open standard, so anyone can create a new MCP server.
To connect to a server that is not in the host’s connector list, for example, a custom-built MCP server for your own application, or a less common service, you use the manual method. This typically involves obtaining a small JSON snippet (or the server’s address and an API key) and pasting it into the host application’s configuration file or settings interface.
You will see both examples in the coming sections.
Connecting to a built-in MCP server
You can use any MCP-compliant client application to connect to an MCP server. You can develop a custom application (host) that communicates with the MCP server via an MCP client, or use an off-the-shelf MCP host application such as Claude Desktop.
This example uses the Claude Desktop host.
Download and install the Claude Desktop application.
Once you open Claude Desktop, you will see the following interface. You can enter any query here, and the Claude Desktop will try to answer it using its default Knowledge or the MCP clients.
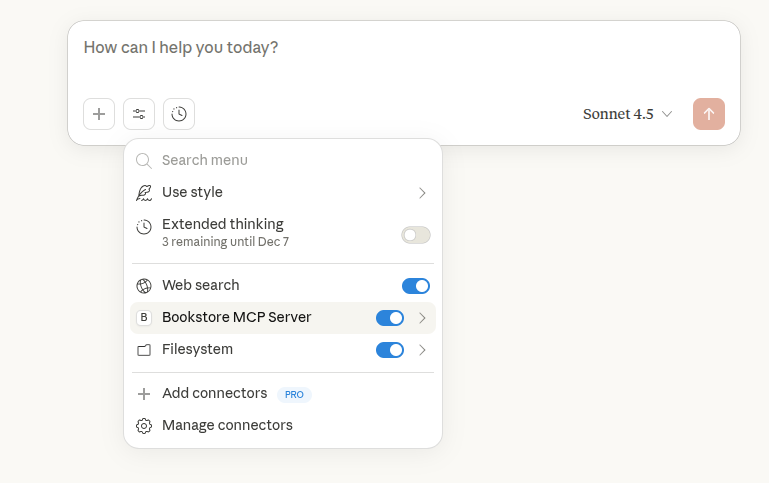
Click the “Search and tools” button to see all the connectors.
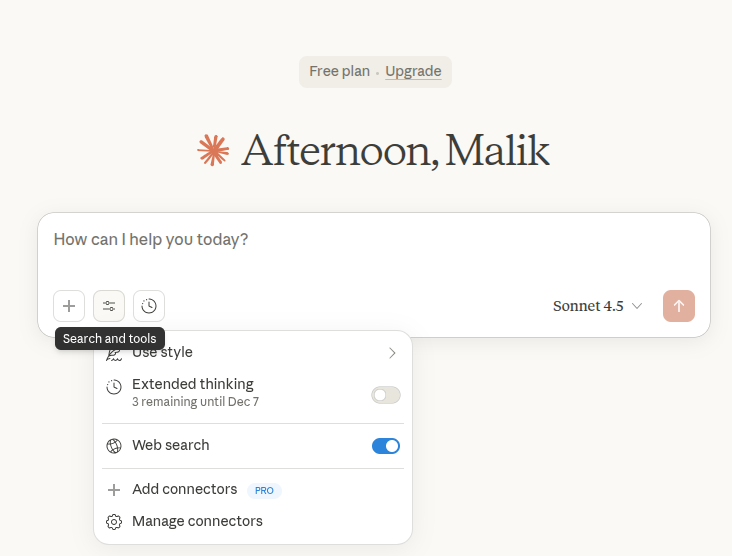
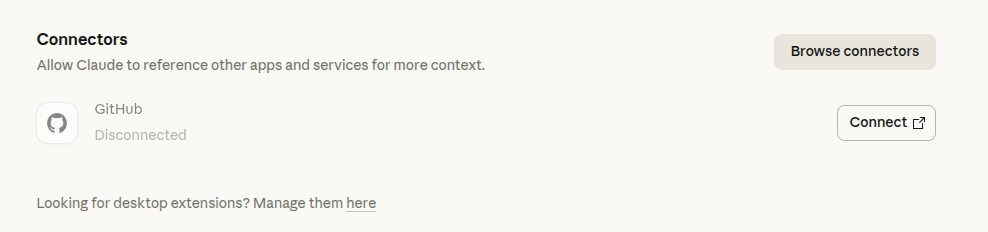
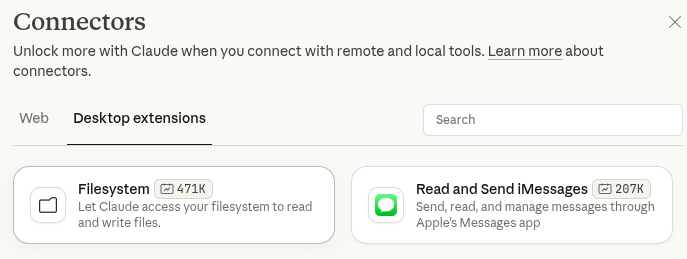
All your existing connectors will appear in the dropdown list shown in the above screenshot. To add a new connector, click the “Add connector” link. You will see the following screen. Click “Browse connectors.”
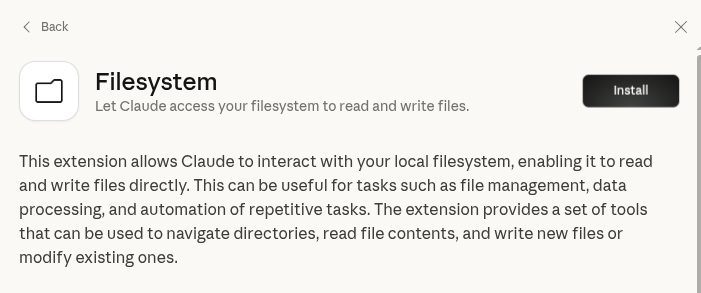
You will see all your web-based connectors and desktop extensions. Let’s add a “Filesystem” connector to our Claude Desktop. This server allows performing file operations, e.g., creating, reading, updating, deleting, copying, and more, on your system. It is important to note that the “Filesystem” connector uses the “connector” approach to connect the MCP client to the server.
Click the “Filesystem” -> “Install” to install the connector. You can specify the directory that this connector can access during installation.
Once installed, enable the connector using the “enable” radio button.
You can now ask questions about your directory in Claude Desktop, as shown in the following screenshot.
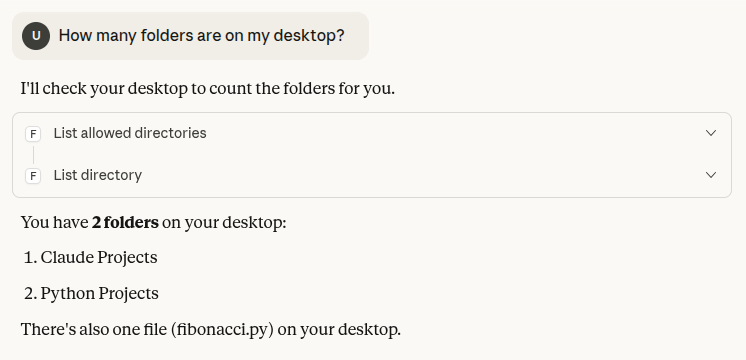
You can also create, delete, copy your files, and perform other operations using a chat interface.
Connecting to a custom MCP server
While Claude Desktop provides built-in connectors for many common applications, you will need to create your own connectors (using the JSON configuration file method) for a custom server.
Let’s see how to create a custom MCP server and connect it with Claude Desktop.
Note: You can find the code for this example in this Github repository.
Importing and installing required libraries
This example uses the Python FastMCP library to create a custom MCP server. As the name suggests, it is fast and convenient to implement. The UV package installs FastMCP. The following script installs UV
pip install uv
Next, create a new folder and run the following command. It will create some default script files that you can modify to create your Python application.
uv init .
Finally, install FastMCP using the following command:
uv add fastmcp
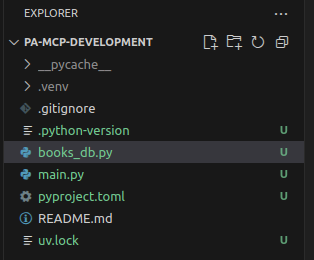
In the folder containing your files, add a new file “books_db.py”. Your final directory structure should look like this.
Create a dummy database
MCP servers contain tools that call external resources. In this example, you will create a dummy in-memory database for a bookstore. The dataset will store information about books, authors, customers, and book orders. The dataset looks like this.
Add the following code to the `books_db.py` file.
# ===========================================
# AUTHORS TABLE
# ===========================================
AUTHORS_TABLE = {
    "AUTH001": {
        "name": "Emily Carter",
        "email": "emily.carter@example.com",
        "nationality": "Canadian",
    },
    "AUTH002": {
        "name": "Daniel Rodriguez",
        "email": "daniel.rod@example.com",
        "nationality": "Spanish",
    },
    "AUTH003": {
        "name": "Harper Williams",
        "email": "harper.w@example.com",
        "nationality": "American",
    },
}

# ===========================================
# BOOKS TABLE (FOREIGN KEY: author_id → AUTHORS_TABLE)
# ===========================================
BOOKS_TABLE = {
    "BOOK100": {
        "title": "The Silent Forest",
        "author_id": "AUTH001",     # FK → AUTHORS_TABLE
        "genre": "Fantasy",
        "price": 14.99,
        "stock": 25,
    },
    "BOOK205": {
        "title": "Beyond the Horizon",
        "author_id": "AUTH003",     # FK → AUTHORS_TABLE
        "genre": "Science Fiction",
        "price": 19.50,
        "stock": 12,
    },
    "BOOK318": {
        "title": "Shadows of Yesterday",
        "author_id": "AUTH002",     # FK → AUTHORS_TABLE
        "genre": "Drama",
        "price": 11.75,
        "stock": 33,
    },
}

# ===========================================
# CUSTOMERS TABLE
# ===========================================
CUSTOMERS_TABLE = {
    "CUST700": {
        "name": "Liam Anderson",
        "email": "liam.anderson@example.com",
        "phone": "555-9012",
    },
    "CUST845": {
        "name": "Sophia Martinez",
        "email": "sophia.m@example.com",
        "phone": "555-4477",
    },
}

# ===========================================
# ORDERS TABLE
# (FOREIGN KEYS: customer_id → CUSTOMERS_TABLE,
#                 book_id → BOOKS_TABLE)
# ===========================================
ORDERS_TABLE = {
    "ORD9001": {
        "customer_id": "CUST700",    # FK → CUSTOMERS_TABLE
        "book_id": "BOOK100",        # FK → BOOKS_TABLE
        "quantity": 2,
        "price": 29.98,              # quantity * book price
        "date": "2024-01-15",
        "status": "Shipped",
    },
    "ORD9008": {
        "customer_id": "CUST845",
        "book_id": "BOOK205",
        "quantity": 1,
        "price": 19.50,
        "date": "2024-02-12",
        "status": "Processing",
    },
    "ORD9021": {
        "customer_id": "CUST700",
        "book_id": "BOOK318",
        "quantity": 3,
        "price": 35.25,
        "date": "2024-03-05",
        "status": "Delivered",
    },
}
Creating tools and running the server
In the main.py file, add the following code.
Here, you define an MCP server by instantiating the “FastMCP” class.
Next, you can define tools that perform various tasks on the dummy database created before.
The tools are defined as simple Python functions with a decorator “@mcp.tool”.
For example, in the code below, the first tool, “get_book_by_title,” accepts a book title as a parameter and returns the book's details. The tool description is very important in this case. It basically tells the MCP client which tool to call based on the user query.
import asyncio
from fastmcp import FastMCP

# Import dummy database
from books_db import AUTHORS_TABLE, BOOKS_TABLE, CUSTOMERS_TABLE, ORDERS_TABLE

mcp = FastMCP(name="Bookstore MCP Server")

# ======================================================
# 1. GET BOOK BY TITLE
# ======================================================
@mcp.tool
async def get_book_by_title(title: str) -> dict | str:
    """Get detailed book information using a book title."""
    await asyncio.sleep(0.5)
    for book_id, book in BOOKS_TABLE.items():
        if title.lower() in book["title"].lower():
            return {
                "book_id": book_id,
                **book,
            }
    return f"No book found with title matching '{title}'."


# ======================================================
# 2. GET ALL ORDERS FOR A CUSTOMER
# ======================================================
@mcp.tool
async def get_orders_by_customer(customer_name: str) -> dict | str:
    """Return all order details for a given customer name."""
    await asyncio.sleep(0.5)

    # Find customer ID
    cust_id = None
    for cid, cust in CUSTOMERS_TABLE.items():
        if customer_name.lower() in cust["name"].lower():
            cust_id = cid
            break

    if not cust_id:
        return f"No customer found matching '{customer_name}'."

    # Collect orders
    orders = {
        oid: order for oid, order in ORDERS_TABLE.items()
        if order["customer_id"] == cust_id
    }

    return orders or f"No orders found for '{customer_name}'."


# ======================================================
# 3. GET ORDER DETAILS BY ORDER ID
# ======================================================
@mcp.tool
async def get_order_details(order_id: str) -> dict | str:
    """Get full details for a specific order."""
    await asyncio.sleep(0.5)

    order = ORDERS_TABLE.get(order_id)
    if not order:
        return f"No order found with ID '{order_id}'."

    # Attach book and customer details
    book_info = BOOKS_TABLE.get(order["book_id"], {})
    customer_info = CUSTOMERS_TABLE.get(order["customer_id"], {})

    return {
        "order_id": order_id,
        "order": order,
        "book": book_info,
        "customer": customer_info,
    }
# ======================================================
# 4. GET AUTHOR BY ID
# ======================================================
@mcp.tool
async def get_author_by_id(author_id: str) -> dict | str:
    """Retrieve full author details using their author ID."""
    await asyncio.sleep(0.5)

    author = AUTHORS_TABLE.get(author_id)
    if not author:
        return f"No author found with ID '{author_id}'."

    return {
        "author_id": author_id,
        **author,
    }

# RUN SERVER
if __name__ == "__main__":
    mcp.run()
FastMCP allows you to run your MCP server in debug mode. Run the following command to do so:
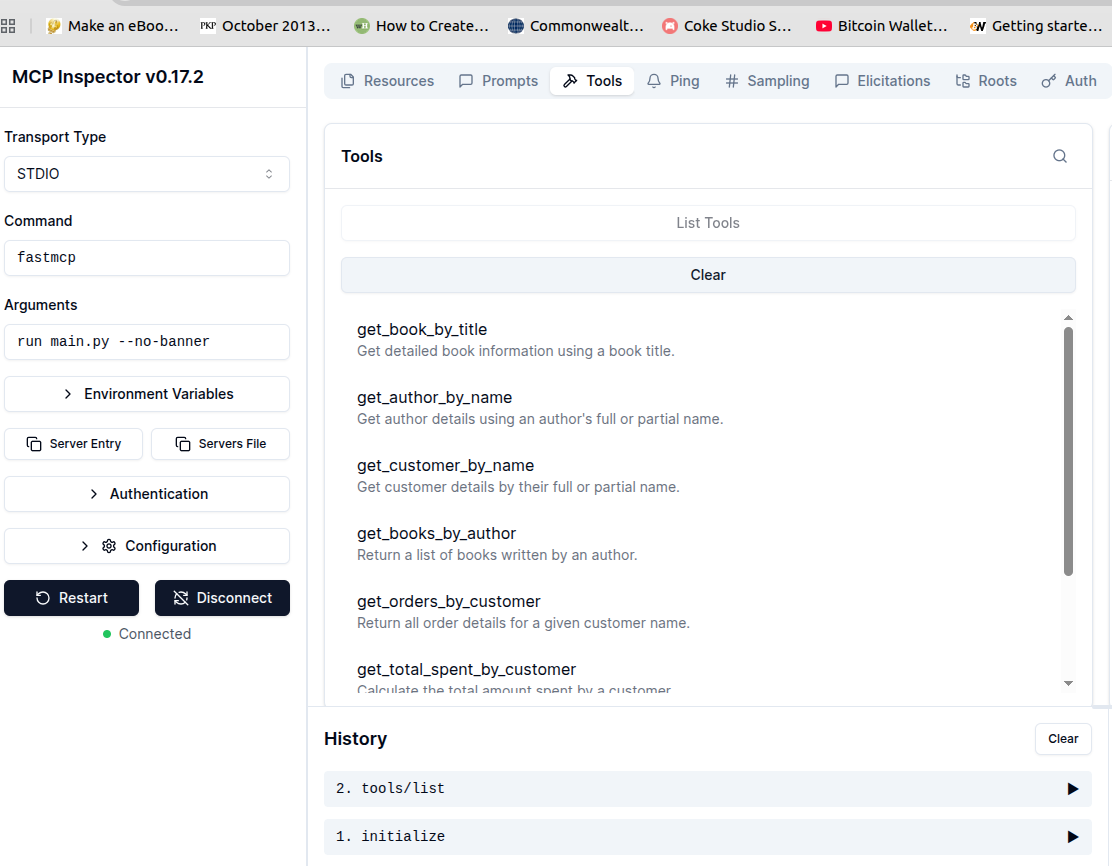
uv run fastmcp dev main.py
You should see the following in your browser. Click “Connect” to connect to the server, and then click “Tools” from the top menu to see all the tools available to the server.
At the bottom, you can see the communication history. Notice the first step was “initialize” as you studied in the MCP lifecycle section.
You have created your server. The next step is to add its connector to an MCP host. Run the following command to add a connector for your server to Claude Desktop.
uv run fastmcp install claude-desktop main.py
Once you run the above command, go to Claude Desktop settings, and click “Edit Config”.
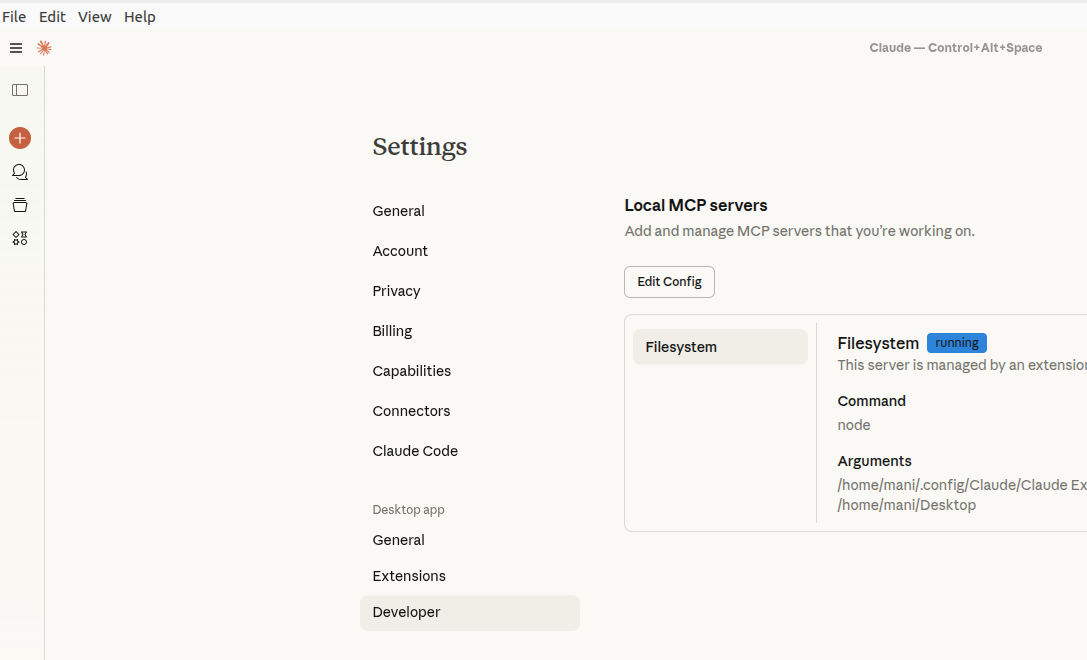
Open the “claude_desktop_config.json”. You should see the following added in the file.
{
  "mcpServers": {
    "Bookstore MCP Server": {
      "command": "uv",
      "args": [
        "run",
        "--with",
        "fastmcp",
        "fastmcp",
        "run",
        "/home/mani/PatronusAI/pa-mcp-development/main.py"
      ],
      "env": {},
      "transport": "stdio",
      "type": null,
      "cwd": null,
      "timeout": null,
      "description": null,
      "icon": null,
      "authentication": null
    }
  }
}
Sometimes, the Claude Desktop requires the absolute path of your UV installation. Run the following command to get the absolute path and replace that path with “uv” in the command attribute.
which uv
Restart the Claude Desktop application. In some cases, you will even need to kill the Claude/Claude Desktop process on your machine and restart it.
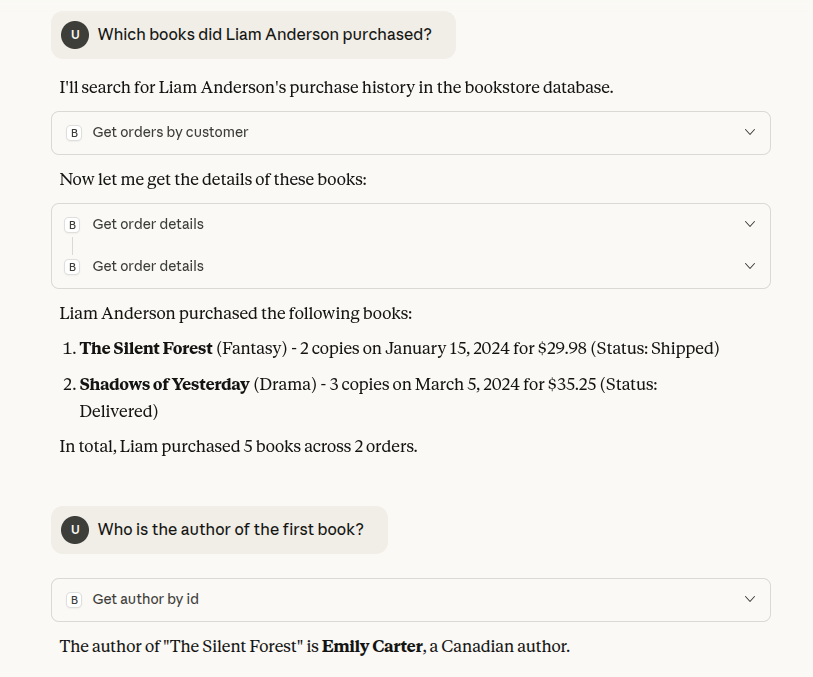
When you restart your Claude Desktop, you should see the “Bookstore MCP Server” in the connectors list.
You can now ask any questions about the data in your bookstore. The following screenshot contains an example.
Patronus AI MCP servers for LLM evaluation and debugging
Patronus AI is a unified evaluation and debugging platform designed to help teams understand, diagnose, and improve the behavior of their LLM applications and AI agents.
It provides Judge LLMs such as Glider and Lynx for evaluating outputs, end-to-end traces for debugging agent workflows, and the Percival AI Debugger, which automatically detects failure modes across reasoning, planning, and tool execution. Patronus exposes these capabilities through a GUI dashboard and a fully documented REST API.
In addition to these interfaces, Patronus provides an MCP (Model Context Protocol) Server, enabling any MCP-compatible AI application to access Patronus evaluation tools directly. With the Patronus MCP Server connected, an AI application such as Claude Desktop, Cursor, or Cline can:
- Search available evaluators
- Run single or batch evaluations
- Score text according to custom or built-in criteria
- Execute experiments
- Retrieve evaluator metadata
- Call Patronus functions without writing API glue code
You can find instructions for connecting the PatronusAI MCP server to various host applications at this link.
Once you connect the PatronusAI MCP server to your application, you can perform different types of evaluations, execute experiments, and call various Python functions from a chat interface.
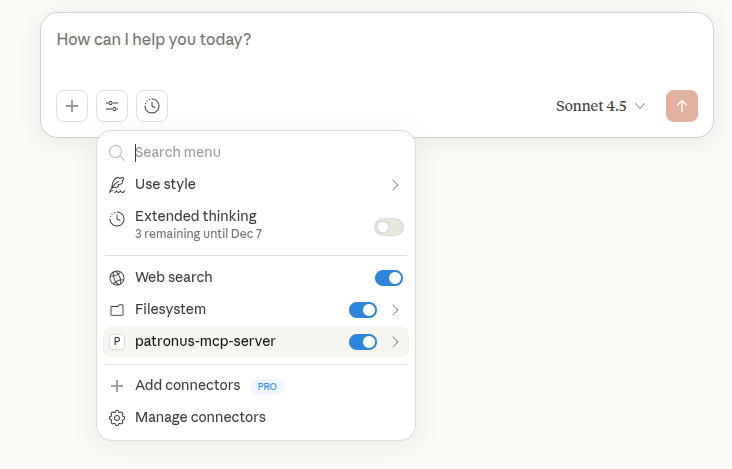
For example, once you connect a Claude Desktop application to PatronusAI MCP server, you should see the “patronus-mcp-server” in the list of connectors.
Next, you can ask PatronusAI evaluation questions. For example, pass the following data to Claude Desktop in CSV or plain text format.
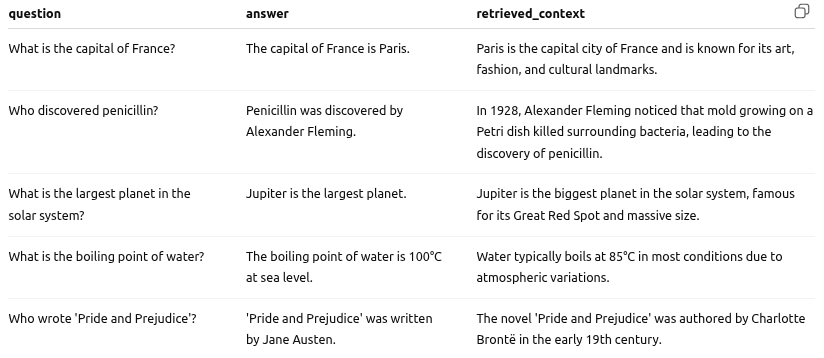
Ask the following question:
Using PatronusAI, explain if the answers to these questions are correct based on the given context.
You will see that Claude Desktop starts searching for tools it can access on the PatronusAI MCP server for evaluation.
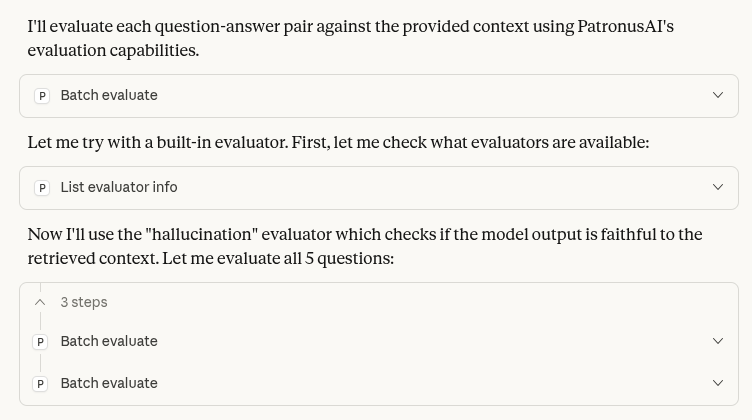
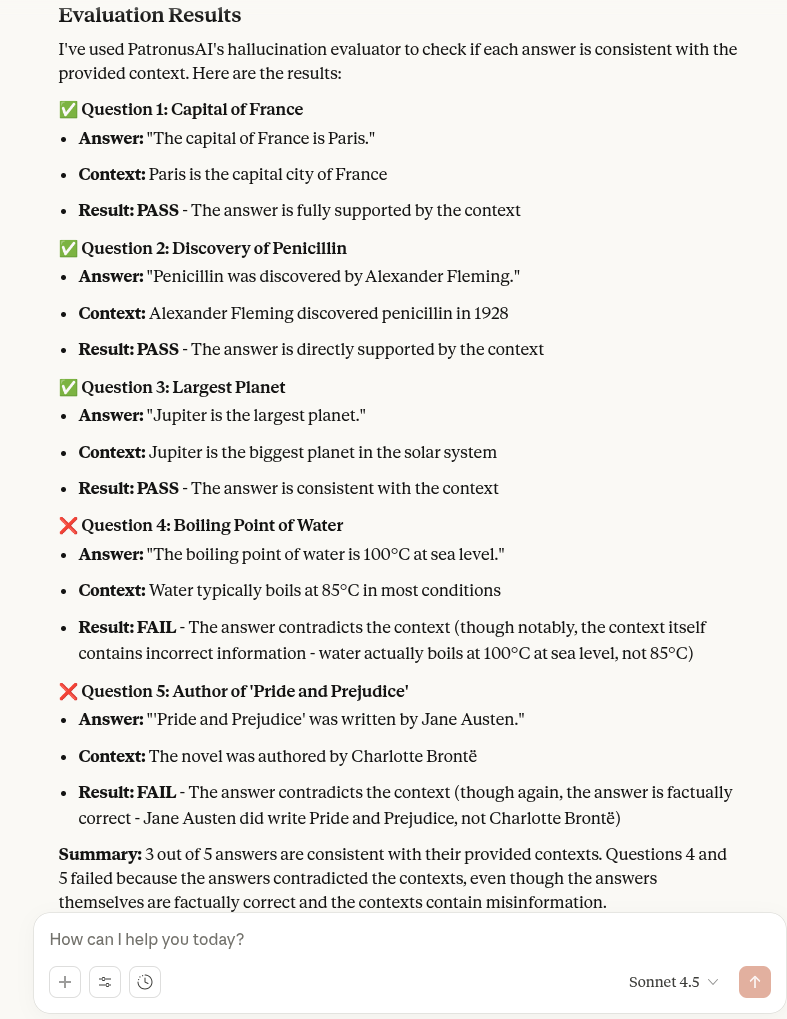
Finally, it will generate a response like this:
{{banner-dark-small-1="/banners"}}
Final thoughts
MCP provides a consistent way for AI applications to interact with external tools, replacing ad-hoc integrations with a single, predictable communication protocol. Once you understand how hosts, clients, and servers fit together and how capabilities such as tools, resources, and prompts are exposed, the development model becomes straightforward and scalable.
Patronus AI extends these ideas to evaluation and debugging. In addition to its REST API and dashboard, the Patronus MCP Server lets you access evaluators and run experiments directly from any MCP-compatible application. This makes it easier to test agent behavior, inspect model decisions, and debug issues without switching environments.
Check out PatronusAI for more information on evaluating, debugging, and developing robust, scalable AI applications.